GAnalytics

Thursday, December 2, 2010

New project and bra cups

After a long long time of not sewing anything for real, I've finally started a new project. Good warm weather is over and I'm not inspired to make anything for the normal wear. So, it's time to get back to ballroom. I'm still thinking whether I should stone my black dress which I finished earlier this year, but my coaches are telling me "no black". Which means I have to start a new dress.

In the past several months I've been learning how to make my own patterns. In particular, I've been trying to create a pattern for a bodice such that I can just take and modify for any design I want. I think I have one that I'm happy with and I can change it relatively easily.

What I want to have in a ballroom bodice is the bra cups that are sewn in kind of like in a corset. I found this style of bodice in 2 dresses that I bought from the same designer and I absolutely love this concept. I did this in my first black dress. Of course, it's possible just to attach plain cups to a bodice like most ballroom dresses on the market have. My current dress has it this way, but it's also made such that the bodice below the cup is a separate piece and it's done without darts. Then the cup part has the dart and the plain cups are just sewn in. I guess this is the same concept without enclosing the cups into the fabrics. But I find it much more comfortable and secure to have the cups sewn in.

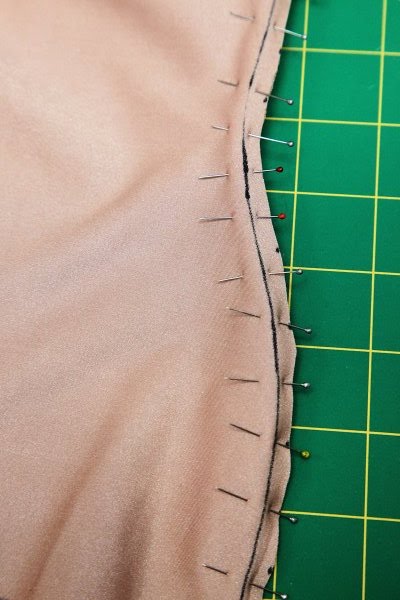
I've started a new bodice and I started with the covers for the bra cups. I might still tweak the pattern, but this is the result:


One thing I don't quite understand is how to keep the middle seam open. You can see that I'm keeping it by making a big zig-zag stitch on the top, but the original cup from the designer does not have it. The seam seems to open without anything holding it. If the fabric is cotton, then it's possible to just press it with iron. But this is lycra and it's almost impossible to iron it enough to hold any shape. In addition, I sew the pieces together with a zig-zag stitch and it is pretty hard to open it even though the zig-zag I use has very narrow width. The wide zig-zag works fine, but I wonder how it can be done without.

In the process, Marbles was trying to help (very helpful indeed :)


Next, I'm going to cut the rest of the bodice and sew in the cups.

EL

Wednesday, October 20, 2010

New sewing life

Seems like Marbles is getting used to her new home, so I attempted to sew in her presents. By now, I have learned that it's better to allow her to participate in whatever I do, otherwise she gets anxious and increases her efforts to participate. For example, she now runs in superman fashion into the plant room whenever someone goes into it.

Here is my calm cat sewing:


There are some things I have to be careful of, though:

1. Do not allow the cat near pin cushion.
2. Watch out for the needle of the sewing machine as she wants to play with it.
3. Do not leave the cat alone with the sewing machine or she will eat the thread.

Otherwise, it's all good.

EL

Sunday, October 17, 2010

Pet proof

The population of our apartment just increased by one pet. More specifically, we got a cat whom we brought from New York this weekend. She is an absolutely gorgeous Scottish fold with very nicely folded ears and humongous eyes.

Meet Marbles, our new cat.


In general, I'm not s cat person because my parents always had dogs. I actually thought I would not be able to have a cat ever. And now, see, I have my own cat.

She likes to sleep on her back.


And she likes to eat plants.


She is very smart and social. She follows me around the house and absolutely has to participate in everything I do. We got her from a Russian family and the woman there told me that Marbles like to "sew". That is, when the woman sews, cat likes to participate. This was a little concerning already then, but now I'm very concerned about the future of my sewing projects. My other concern is my plants as she already attempted to eat them. Sounds like it's time to make the apartment cat proof.

Up till now I didn't really have a dedicated sewing space, so I'm planning to make my own in the plant room. I'm not going to let her in that room anyway. Let's see what I can do.

EL

Sunday, October 10, 2010

What are the chances?

Often, when I sew 2 pieces of fabric together, I pin them so that the pins are perpendicular to the sewing line.


When the machine (not the serger!) approaches the pin, I normally do not take the pin out. What are the chances of the tiny point of the needle to not only hit the pin but also to do it so perfectly that the pin or the needle would break? I always assumed that the chances are so small that it's not worth taking the pins out.

See this little demonstration of how it goes:


This was all nice and true until today. So, what happens when the needle and the pin are perfectly aligned is that one or both of them break. In my case, the needle did not give up, but the pin was completely jammed into the machine. It was a pretty scary scene, worth rethinking the chances and the method. The middle of the pin was completely inside while both ends were sticking out. It took me some strength and help of the pliers to remove the pin out. Look at the great shape of the pin now:


So what are the chances? I think by now I've sewn through thousands of needles like this which does keep the chances pretty small. However, they are not infinitely small and I expect same thing to happen in another year or so. And no, I'm not going to give up on the method as it makes my life so much easier most of the times.

EL

Friday, October 8, 2010

Look who is sewing now!

In the past couple of weeks I have done some sewing, but I didn't finish anything significant to show here. There was the skirt for my new dress, there was also underskirt for my new dress... But most of the time, I've been drawing patterns of the bodysuits and making test garments to check the fit. However, the machine was occupied a lot by Tuan!

It started with the first set of the home made exercise bands we made. Tuan decided to make a bunch for his dance exercise class so I had to show him how to use sewing machine. And he was hooked. He made several more sets of the bands and I could not see my machine during that time at all. I'm not complaining, I was preoccupied with my patterns anyway. The best part is that he made me my own personal set.


Mine feature main part in light blue with dark blue top, pink threads and a logo. Also, see the improved design of the handles and the door piece. Now, it's not as hard on the hands and the door is protected from scratching.


I like the fact the we can make the bands in different colors. The original TRX bands are black/yellow combination which makes me feel like I'm on a construction sight every time I see them. BTW, I saw them this week when my trainer brought them to our session. Oh, they made me sick in my stomach. But it was worth it. Ever since I started using them, Tuan is saying I feel lighter when I dance. I guess those core exercises do help.

My only contribution was to put the DF logo on it (mainly to claim they are mine and not for the class :), which means Dance Fit, and to make a small pouch.

Here is the pouch.


It's made of thin nylon with a zipper on the top.


Besides chiffon, I've never used such thin fabric before. It didn't make sense to use a serger here, because I wanted to make very clean edges so that when the bands are inside, there is no chance of fraying.


It made me appreciate commercially made pouches like that. I didn't think much of them till now, but apparently, it's hard to insert a zipper on the top. I still can not figure out how they make the top stitch at the end of the zipper. I'm going to exercise now, see you later.

EL

Tuesday, September 21, 2010

Hair and dancing

We were at a competition in Connecticut last Sunday. It was a small, but nice one. It was also during the day, so we had to prepare and be there (which is a 2-hour drive) by 1 pm. This means I had a lot of things to do with my hair very early in the morning.

The results:


The close up:

Band making

Last week I went to the gym to see my trainer. He came well prepared and brought special bands to make sure I don't slack off and get enough core and balance exercise. I've heard about these bands before and wanted to try. They are called TRX bands and cost some crazy amount of money. I think he mentioned he got them for $200. A brief look at the bands revealed they are nothing more than just some webbing with cam buckles, a carabiner and handles.

So, over last weekend, Tuan and I decided to make the bands from nylon straps. Not sure if the real thing is nylon, but nylon is a good enough for the first try. Here is the result of the team work:


These are the handles. The white tubes are for the hands and the low loop is for the feet.


The view of the top. The loop with the carabiner is attached to a piece that goes between the door and the door frame.


This is the top with the door hanger. The hanger can be detached to loop around a beam.


The door hanger piece from the other side of the door:


And here is the first tryout of the bands.


After trying the bands last week, I was in pain for several days. I guess they do work.

EL

Tuesday, September 14, 2010

Practice shirt, rolled edge and new book

Last night I wanted to start my new ballroom dress, but then I went to the gym and got tired so I decided to make something fast and simple. Practice shirt seemed like a good idea. I made a pattern and cut fabric. Again, it was supposed to be a small project with only 4 seams and maybe some rolled edge on the neck line, bottom and arm holes. I serged the pieces together and started with the rolled edges. OMG, I thought lycra behaves better than chiffon! I kind of does, but not when you have sharp corners to turn. So, the first shirt went to waste. I had to modify the pattern and make a whole new piece.


Disregarding the first shirt, total time spent was only 2 hours from pattern construction to finished shirt!

And today I got a new pattern making book. I just flipped through it, it looks so good! Finally, I'm going to make patterns based on theory.

EL

Monday, September 13, 2010

Box Pleats and a new skirt

After completing my first full skirt mentioned here, I decided to try another one but with thicker fabric (the summer is over..) and with box pleats. Box pleats look more symmetrical on the hips and more full to me. So, I got this thick cotton fabric and started working.


Unfortunately, by computer hard drive decided to die, so I had to redo the pattern. Basically, the 2 pieces of "pattern" I made were the belt and the lining, both are A line skirts of different lengths and sizes. In addition, the difference with the previous skirt was that the skirt itself used 3 fabric pieces and not 2. So, it's more full, 130" length on the hem. Other than the lining and the belt, the skirt construction is pretty simple. Cut 3 rectangles from the 44" fabric such that the longer side is 44", then connect them and make the pleats. As before, I used fusible interfacing for the belt, lining and invisible zipper that goes between the skirt and the lining. The final result:


And the zipper view from inside:


Tuan decided to hook me on to watching Mad Men show. I don't mind, the costumes are spectacular there. I especially like the bottoms and I guess the skirt I just made is kind of like that.


Finally, ballroom dress is next in queue.

EL

Friday, September 10, 2010

Dress from a pattern

Earlier in August I made a dress using Simplicity 2373 pattern.


This was my second dress attempt and the second time I tried to use a commercial pattern. The first dress was a failed attempt and this one came out pretty good. What I found is that the patterns are ok, but the instructions and the sizing are pretty bad.

First, if I just look at my measurements and use the corresponding pattern size, it's the first step to failure. The first dress was supposed to be a strapless dress, so you can imagine that if the top is too big, then there is no chance. For some reason the final garment has too much nap and so my first dress ended up being unusable. After learning this, for the second dress I used the measurements of the final garment instead of the body measurements to choose the size. This worked much better.

Second, the instructions are either incomplete or too confusing. The first dress instruction never told how to attach the top to the bottom and how to attach the lining. This dress instruction instructed to cut fusible interfacing for the straps but never mentioned when to attach it. So, after cutting the pattern, I just assembled the dress the way I wanted.

In addition, I changed the inside of the top to have 2 layers, because I just don't like bad looking inside. Since this dress didn't have lining, I didn't want to have all these seams showing inside on the top.


Finally, this was my zipper number 3. I attached it with teeth showing on the outside as I wanted to try attaching without sewing the 2 sides of the dress together. The zipper color was a perfect match to the dress color, so it was ok to show it.


Next up, making my own patterns...

EL

Tuesday, September 7, 2010

Back from LA

Last weekend we went to Los Angeles for the Embassy Ball competition. Of course, being in LA I had to check out their fashion district where, as I heard, 100s of fabric stores are concentrated in a relatively small space and the fabrics are so cheap that it's impossible not to buy a lot. Well, the concentration of the stores is true, but the prices are low if you're coming from somewhere you don't have 2 discount fabric stores 5 min walk from your house. But if you're coming from NY fashion district, then the prices are great.

First of all, the amount of stores is just crazy. We spent several hours just going from one to another. In the process, we slowly learned that many stores sell the same fabrics and it's very hard to find good quality stuff. I guess if you live in LA, you just find favorite stores and go there, but we didn't have this knowledge. Better quality stores are more expensive though. I particularly liked the store I got some chiffon and a fabric very similar to Chrisanne's dance crepe. Interestingly, the "dance crepe" fabric was produced in the US and was obviously much cheaper than Chrisanne.

Second, the prices are not stable there and you have to haggle. From conversations with a store owner, the economy is really bad and the stores are not doing very well. So the first price they ask is a bit higher than I would expect. Being trained by my local discount stores, I just could not justify most purchases since I could get the same fabrics for same or lower price at home. The only stores that were absolutely amazing are the everything for $1 per yard. Here I bought about 20 yards of organza! This is just perfect.

Overall, some fabrics for dance costumes were relatively hard to find. Non of the store owners I talked to had every seen satin chiffon. They kept pointing at the lining, which is not the same and does not drape as well. It was also hard to find good light satin. Sportswear lycra was somewhat missing as well. Horsehair braid was not available in any trim stores.

What was easy to find were organza, chiffon, lycra for practice wear, stretch net.

So, my overall haul was: white stretch net, white chiffon, white organza, hot pink organza and black "dance crepe". You can see where it's all going, it looks like I'm going to make white ballroom dress next.

As for made by EL stuff to show... I did make my own hair for this competition, but I forgot to take a photo of that. I also don't see the official photographs from the event, so I'm going to post a picture of my hair I did for Blackpool this year. Sorry about the blurriness. I took it in the dark room with my shaky hands using my iPhone.


EL

Wednesday, September 1, 2010

Is it harder to sew non stretch?

I have been reading a lot of sewing blogs lately and everywhere I go the dominating opinion is that non stretch fabric is easier to deal with. Or it's maybe I somehow got into the circle of blogs that share this opinion. I am, however, surprised to see this. Ok, my first ever project was a non stretch skirt in a sewing class at my school when I was about 10 years old. More on this later. After that project I had a long lasting rejection of sewing in general. Only when I picked up sewing recently, I found that I actually enjoy it especially when I use stretch fabrics and a serger. The first thing I did was the bodice for my ballroom dress I showed previously. All was great until I needed to make the non stretchy parts of the dress like a skirt and the floats. They were much more difficult to complete because you can immediately see all the mistakes, especially mistakes in thread tension. Granted, I went straight to the more difficult types of fabrics like light weight silk charmeuse and chiffon, but still, I found it much more difficult than the stretch fabrics.

Anyway, I decided to conquer my fear of non stretch fabrics and make a summer skirt. So, I made myself a pattern, got some pretty cotton fabric + lining, fusible interfacing, spent a couple of days figuring out how to put it all together and here it is.


I made invisible zipper on the back of the skirt which is zipper number 2 in my life. This one I put between the lining and the skirt. It took me some time to figure out how to do this. I'm sure it's not a big deal for people who are experienced in this, but since it was my first this type of zipper, I spent some time putting it into the belt and the lining at the same time. So, here is how it look from the back.


I put a lining inside which is simply an A-line skirt I attached to the belt. The belt has fusible interfacing inside.


The conclusion, it's not as bad as I thought. Unlike a ballroom dress that takes a lot of time, I was able to quickly make this skirt from scratch. But I still stand with the opinion that stretch fabrics are easier. Just need to prove it to my self by maybe making a knit skirt? Next up, though, is a dress from a non stretch fabric. I actually already competed it and will post when I have a chance to take some pictures of it.

Happy sewing for now.
EL

Wednesday, July 28, 2010

2 floats

I made the second float and this time, it was pretty easy. I was lucky I found the same fabric in the shop, so I had enough to cut another big float. Sewing was quick this time, no problems at all. I think my machine is smart enough and the less guiding I do, the better.

I haven't attached it to the dress yet. I'm thinking of using the gloves I made since I don't have enough stretch lace to make another set of gloves. But overall, I think this is how it's going to look.

Sunday, July 25, 2010

Meet my guest

Can't wait to show a picture of Mary's mannequin dressed in my new gown.

I like crinoline

I successfully completed 1 float. This is a good part. The bad part is that I was supposed to finish 2 floats but 1 of the floats became a victim of my serger. I absolutely hate making rolled hem on a serger, but I absolutely love how it looks. Anyway, I managed to make 1 float, and ran out of fabric to make another one. I hope I can still get that fabric for another float. Just to show how it looks, here is the picture.


And, I figured out how to make crinoline curl! It's pretty cool, I'm very happy about it. And... Tuan helped me with burning the ends of the crinoline to make them skinny and neat.

Saturday, July 24, 2010

Pattern for my new floats

Today, I drew a pattern for my new floats for the black dress and cut one piece. Since I'm making the floats without any already made ones, I just drew it kind of by hand. Here is the pattern shape.


I got the idea of these floats from this video:


Originally, I made floats like on this video, but then decided to not go with them.

Thursday, July 22, 2010

Floats and rose flowers

I was thinking today that I'll probably change the floats of the black dress. Originally, I wanted to have them to look more casual. Kind of like what many Russian and Italian girls are wearing these days. But then I'm thinking to try a big floats that look like there are no floats on the arms. You'll see.

But for now, I'm leaving you with my recent creation. It's made of 14K gold filled findings and Swarovski stones.

Monday, July 19, 2010

Start here...

I've been getting requests to show projects I'm working on. I'll try to use this place to post some pictures and descriptions. Not sure how often I can update here because making a ballroom dress takes a long time for me. I have to juggle work, practice, lessons, comps and other "very" important stuff. So, sometimes I only spend a couple of hours a week sewing or making other things per week. Sometimes I spend a whole day. But with this irregular speed, 1 ballroom dress can take quite a long time to make.

Luckily, I just finished sewing my first gown and hope that my photographing skills didn't rust too much. The pictures of that new gown will come soon.

Or maybe, I'll show you some other things I've made for your entertainment.

Katya